Sunday, March 31, 2013

Hallelujah, He Is Risen- Card #2 !!


Happy Easter (again)!! 

I needed one more card for Easter so I decided to use the Freshly Made Sketches FMS79 Sketch along with the colors from the CQC182 ColourQ Challenge (since I had those colors still out and embossed parts from the previous post).


Again, if you have not had the time, check out both sites for wonderful examples and inspiration!! 

To create this card:

Using the Embossing Buddy®, de-static a piece of Whisper White cardstock and stamp the image from Crosses of Hope using Versamark™ ink.  Apply Stampin’ Emboss® Early Espresso Embossing Powder and heat with the Heat Tool.   Once cooled, color with the Stampin’ Write markers in Pool Party, Wisteria Wonder, Lucky Limeade and Always Artichoke and carefully cut out. 

Use the Big Shot™ to emboss a piece of Whisper White cardstock with the Lacy Brocade Textured Impressions™ Embossing Folder (difficult to see in the photo).  Cut the Whisper White embossed cardstock with the 2 ½” Circle Punch and layer onto another 2 ½” Circle punched from Early Espresso cardstock.  

Adhere the cross with Mini Glue Dots and add the rolled flower with the leaves (flower was created with the 1 ¼” Scallop Circle Punch and the leaves are from the Bird Builder Punch). 

Add the Wisteria Wonder and Lucky Limeade DSP layers (previously embossed from the last post and lightly sanded to expose the white core).  Layer the ribbon and embossed Vellum per the sketch, add the ribbon bow, sentiment and Pearl to finish off the card. 

Stamp Sets: Crosses of Hope, Teeny Tiny Wishes

Ink: Versamark™, Stampin’ Write Markers- Pool Party, Wisteria Wonder, Lucky Limeade, Always Artichoke, Early Espresso

Paper/Cardstock:  Whisper White, Early Espresso, Wisteria Wonder and Lucky Limeade DSP, Vellum

Accessories:  Big Shot™,  Lacy Brocade, Vintage Wallpaper and Delicate Designs (Lace)Textured Impressions™ Embossing Folders, Large Scallop Edgelit™, Punches- 2 ½” Circle, 1” Square (for banner points), Word Window (for sentiment), 1 ¼” Scallop Circle, Bird Builder; Embossing Buddy®, Stampin’ Write® Early Espresso Embossing Powder, Heat Tool, Pearls, 5/8” Satin Ribbon (from my stash)

Thanks again for visiting- I hope all of you have a wonderful Easter celebrating our Risen Savior!!

Hallelujah - He is Risen!!


Hi Stampers! 

Happy Easter!!  I hope all of you have a wonderful Easter celebrating our Risen Savior!!

I needed to create a few more Easter cards and decided to use the colors from this week’s CQC182ColourQ Challenge along with the Nacho Average NAC39 Sketch Challenge.  If you have not visited these sites yet, stop by- they have great samples from their Design Teams as well as the other entries.

To make this quick and easy “hybrid” card:

Print an image from the Crosses of Hope Brush Set from My Digital Studio (MDS)- I enlarged the image form the original stamp size :-)  Color the flowers and leaves using Stampin’ Write markers in Pool Party, Wisteria Wonder, Lucky Limeade and Always Artichoke.  Carefully cut out the cross and adhere the sentiment banner.

Use the Big Shot™ with the Vintage Wallpaper Textured Impressions™ Embossing Folder to emboss a piece of Wisteria Wonder Designer Series Paper (DSP) and a piece of Lucky Limeade DSP using the Lacy Brocade Textured Impressions™ Embossing Folder.  Lightly sand the DSP to reveal the white core.

Layer the DSP onto Basic Black cardstock, add the embossed Vellum lace edge and the satin ribbon band.   Add the cross image using Stampin’ Dimensionals and the satin ribbon bow to finish off the card.

Stamp Sets:  Crosses of Hope (MDS), Teeny Tiny Wishes

Ink: Printer Ink- Black, Stampin’ Write markers- Pool Party, Wisteria Wonder, Lucky Limeade, Always Artichoke, Basic Black

Cardstock/Paper: Whisper White, Basic Black, Wisteria Wonder DSP, Lucky Limeade DSP, Vellum

Accessories:  Big Shot™, Vintage Wallpaper, Lacy Brocade and Delicate Designs (Lace)Textured Impressions™ Embossing Folders,  Large Scallop Framelit™, Punches- 1” Square (for banner points), 5/8” Satin Ribbon (from my stash)

Thanks again for stopping by- I hope you have a glorious Easter!

Wednesday, March 27, 2013

Spring is in the Air!! Three Challenges in One!


Hi Stampers!!

I wanted to create a card using The Paper Players PP138 Sketch Challenge and decided to create a card for Stampin’ Up! Only SUO67 Spring is in the Air Challenge using the colors from this week’s CCMC244 Create with Connie and Mary Challenge.  Hopefully, if you have not already done so, you will take the time to visit each site- the Design Teams and other entries are fabulous!!

To create this card:

Ink the floral image from Summer Solstice using Not Quite Navy (NQN) Classic Ink and stamp onto a piece of retired Bella Chateau Designer Series Paper (Marina Mist swirl).  Color the area around the flowers with a NQN Stampin’ Write marker and a Daffodil Delight marker for the centers.  Mount onto Whisper White and again onto NQN cardstock, add the ½” Daffodil Delight Seam Binding Ribbon with the button (I added a few strips of NQN cardstock as faux stitching).

Using a brayer, lightly apply Marina Mist Classic Ink onto a piece of Whisper White cardstock.  Stamp over the brayered cardstock using the Netting Background Stamp with NQN Classic Ink.  Mount this image onto NQN cardstock and again onto the Whisper White card base.
 
Create the banner using NQN Designer Series Paper (DSP) and add a NQN cardstock layer and mount again onto Whisper White.  Use the 1 3/8” Square Punch to create the banner points on all of the layers.  

Cut around the edge of a Tea Lace Paper Doily and use Sticky Strip behind the banner to layer the Paper Doily edge.  Mount the banner strip to the card per the sketch layout. 

Stamp the butterflies from Summer Solstice using NQN Classic Ink and use the Bitty Butterfly Punch to punch out the butterflies.  Stamp the sentiment from Elements of Style, carefully cut around the image and mount using Stampin’ Dimensionals®.  Add the Pearls to the butterflies to finish off the card.    

Revised version without the button-
Stamp Sets: Summer Solstice, Netting Background, Elements of Style

Ink: Not Quite Navy, Stampin’ Write Markers—Not Quite Navy, Daffodil Delight

Paper:  Whisper White, Not Quite Navy, Not Quite Navy Designer Series Paper

Accessories:  Tea Lace Paper Doily, 1 3/8” Square Punch (for banner points), Bitty Butterfly Punch, Button Latte (retired), ½” Daffodil Delight Seam Binding, Pearls

I decided to revise the card and removed the button- which one do you prefer?


Thanks again for stopping by- have a wonderful week!

Tuesday, March 26, 2013

Sunflower Madness :-) Monochromatic Fun


Hi Stampers! 

I love this week’s Just Add Ink JAI158 sketch challenge and from the moment I saw the sketch, I wanted to use My Digital Studio (MDS) with the Sunflower background image to create this card.   

I just love how you can re-size the images in MDS (especially the large background stamps) and since I chose to use black, gray and white, this card also qualifies the Splitcoaststampers’ Try A New Technique TLC422 Challenge- Monochromatic Madness

Again, if you have not had the time to visit either site, I encourage you to do so- wonderful examples to inspire your creativity!!

To make this “hybrid” card:

Print an image of the Sunflower Stamp Brush Set from My Digital Studio (MDS) onto Whisper White (again, re-sized to fit the card- love it!!) and cut the image out with a Circle Cutter.  Also cut another circle the same size from Basic Black cardstock to layer behind the image.   Cut both circles/images in half and layer the Basic Black behind the sunflower image so that just a bit of the black border shows.

Use the Big Shot™ with the Lacy Brocade Textured Impressions™ Embossing Folder to emboss a piece of Whisper White cardstock.   Add the Designer Paper layers per the sketch, the sunflower image and the 5/8” Basic Black Satin Ribbon bow.  Mount this entire panel onto Basic Black cardstock and again onto a Whisper White card base.

Add the printed sentiment (again using MDS and the 1” Square Punch to create the banner points) along with the colored Pearls to finish off the card.  *** Hint-  use a Black permanent marker to color the Pearls- instant Black Pearls :-))  ***


Quick and easy- I think I am getting hooked on these "hybrid" cards :-)

Stamp Sets:  Sunflower, Loving Thoughts (both MDS)

Ink: Printer Ink- Black

Cardstock: Whisper White, Basic Black, Basic Gray Designer Series Paper Stack
Accessories:  Big Shot™, Lacy BrocadeTextured Impressions™ Embossing Folder, Punches- 1” Punch (for banner points), Pearls, 5/8” Basic Black Satin Ribbon (retired)


Thanks again for stopping by- I hope you enjoy this card (I had fun making it!!)

Monday, March 25, 2013

Just Because- Butterfly in Pink :-)


Hi Stampers! 

I love the inspiration photo for this week’s Stampin’ Royalty SR168 Challenge and decided to create a card again in the wee hours of the morning :-)   I incorporated the soft pinks from this week's DD45 Dynamic Duos Challenge  along with the Pals Paper Arts PPA155 Sketch Challenge.  

Again, if you have the chance, check out the Design Team samples and other entries at each site- great job by all!


To make this “hybrid” card:

Print an image of the Swallowtail Stamp Brush Set from My Digital Studio (MDS) onto Whisper White (re-size to fit the card) and color with Stampin’ Write markers in Pretty in Pink, Regal Rose and Basic Black.  Carefully cut around the image and brush on Frost White Shimmer Paint to add a bit of iridescent shimmer to the wings :-)

Create the background for the butterfly (I used a previously embossed piece of Whisper White onto Pretty in Pink and Basic Black cardstock).   

Layer the embossed Regal Rose DSP (with the Big Shot™ and Lacy Brocade Textured Impressions™ Embossing Folder) onto Basic Black and add the layers of Designer Paper per the sketch (I used retired Stampin’ Up! paper from over 10 years ago- trying to use up my massive stash :-)).

Add the 5/8” Pretty in Pink Satin Ribbon bow along with the layered sentiment (also printed from MDS) and a few pearls to finish off the card.

Stamp Sets:  Swallowtail and Creative Elements (MDS)

Ink: Printer Ink- Black, Stampin’ Write Markers- Pretty in Pink, Regal Rose, Basic Black

Cardstock: Whisper White, Pretty in Pink, Basic Black, Regal Rose DSP and Neutrals Background Papers (retired years ago :-))

Accessories:  Big Shot™, Fancy Fan and Lacy BrocadeTextured Impressions™ Embossing Folder, Punches- 1” Punch (for banner points), Modern Label, Word Window, ¾” ad 1” Circle; Pearls, Frost White Shimmer Paint, 5/8” Pretty in Pink Satin Ribbon (retired)

Thanks again for stopping by- I have a good friend that loves pink and think of her every time I create a card using any variation of pink :-).  

Have a fabulous Monday and God Bless!!

Sunday, March 24, 2013

Oh Happy Day#2- Another Three Challenges in One!


Hi again Stampers!!


Here is the second card created this evening using the colors from this week’s CQC181 ColourQ Challenge and the FM78 sketch from Freshly Made Sketches plus this card uses the same musical sentiment so it qualifies as the second card also for the CASology #36 Song Challenge :-).  If you have a chance, check out the challenge sites to see how many different designs can be created with one color challenge and a sketch/topic :-). 

To create this card:

Using Basic Black Classic Ink, stamp the daisy image onto Daffodil Delight cardstock and the flower center onto Whisper White.  

Use the 1” Circle Punch to punch out the flower center- color the flower center using Stampin’ Write Brilliant Blue and Brocade Blue marker.  

Carefully cut out the daisy along the edges and adhere the flower center.

Mount the decorative paper to a piece of Basic Black cardstock and add the strips along the center. 

Stamp the sentiment onto Whisper White cardstock using Basic Black Classic Ink and punch out with the 1 3/8” Circle Punch.  Adhere under the Decorative Paper edge  and add the flower using Stampin’ Dimensionals®.   Add a Pearl to the middle of the flower center.  

Use the Simply Scored™ scoring tool to score lines along the top and bottom of the Whisper White card base and the Simply Scored™ Borders Scoring Plate to add the curved edge along the top of the card base.

Adhere the main focal panel to finish off the card- quick and easy!!

Stamp Sets:  Decorate A Daisy, Bloomin’ Marvelous (SAB 2013)

Ink: Basic Black, Craft White, Stampin’ Write Markers- Brilliant Blue and Brocade Blue (both retired)

Paper: Whisper White, Basic Black, Daffodil Delight, Brilliant Blue DSP (retired Hostess Level I Pack), Neutrals Decorative Paper (SU! first Designer Paper introduced and retired over 10 years ago :-))   

Accessories:  1" Circle and 1 3/8” Circle Punch, Pearl

Thanks again for stopping by- I hope all of you have a fabulous Sunday!!

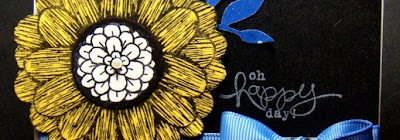
Oh Happy Day! Three Challenges in One!


Hi Stampers!!

I had a great day relaxing with my hubby and decided to take a few minutes to create a card using the colors from this week’s CQC181 ColourQ Challenge and the sketch layout from the #20 CAS(E) This Sketch! plus since this card has a musical sentiment (remember the song) it also qualifies for the CASology #36 Song Challenge as well:-).    I love the Design Team samples on all of these challenge sites as well as the inspiration from all of the various entrants.


To create this card:

Using Basic Black Classic Ink, stamp the daisy image onto Daffodil Delight cardstock and the flower center onto Whisper White.  Use the 1” Circle Punch to punch out the flower center and the Stampin’ Write Basic Black Marker to cover any white edges. Carefully cut out the floral image and adhere the flower center.

Add the decorative paper along the bottom of the Basic Black card front and add the Brocade Blue 5/8” Grosgrain Ribbon bow.  Use Craft White Ink to stamp the sentiment onto the card front.

Use the Big Shot™ with the Sizzlits™ Little Leaves to cut out leaves from the Brilliant Blue Designer Series Paper.  Add the leaves to the card front (I used Two-Way Glue) and adhere the flower with Stampin’ Dimensionals®.   Add the Pearl to the flower center to finish off the card.

Stamp Sets:  Decorate A Daisy, Bloomin’ Marvelous (SAB 2013)

Ink: Basic Black, Craft White

Paper: Whisper White, Basic Black, Daffodil Delight, Brilliant Blue DSP (retired Hostess Level I Pack), Neutrals Decorative Paper (SU! first Designer Paper introduced and retired over 10 years ago:-))

Accessories:  Big Shot™, Little Leaves Sizzlit™, Punches-1” Circle, 5/8” Brocade Blue Grosgrain Ribbon (retired), Pearls

Thanks again for stopping by- I created one more card while I had these colors out on my desk and will post shortly :-)

Saturday, March 23, 2013

Another CAS Card using A Challenging Color Combo!


Hi Stampers! 

I wanted to create a card using the Nacho Average #38 Colors and these colors were truly a challenge for me!!  Whenever I try to combine yellows and pinks, I struggle – that is why I love challenges so much (they definitely get me out of my comfort zone :-)!
If you have a chance, check out this challenge blog- they have a new challenge each week :-)

Again, I turned to my scraps to create this quick and easy "hybrid" card:

Use My Digital Studio (MDS) to print the sentiment from Thoughts and Prayers onto Whisper White cardstock and cut the frame using the Big Shot™ with the Apothecary Accents Framelits™ Die.  I love using MDS for cards- especially for sentiments (do not need to worry about the Stamp-a-ma-jig :-))

Also cut another Apothecary Accents frame from Raspberry Ripple cardstock with the Big Shotand using scissors, cut this frame in half horizontally to layer behind the sentiment.  Use the 1/16” Handheld Punch to add the Antique Brads.

Cut strips from Patio Party Designer Series Paper (DSP) - use the 1” Square Punch to create banner points.  Adhere the banners at various heights behind the framed sentiment and add the 3/8” Raspberry Ripple Stitched Satin Ribbon bow.

Mount an embossed panel of Whisper White onto the Whisper White card base using Stampin’ Dimensionals®  (I used a previously embossed panel using the Fancy Fan Textured Impressions™ Embossing Folder).    Punch a few circles from the Party Pario DSP using the 1 3/8” Circle Punch and adhere towards the top of the card.

Add the sentiment banner panel using Stampin’ Dimensionals®  and adhere the punched butterflies from the Patio Party DSP and Print Poetry DSP stack with Stampin’ Dimensionals®  as well .   Add the pearls to finish off the card.

Stamp Sets:  Thoughts and Prayers (MDS)

Ink: Printer Ink- Black

Cardstock: Whisper White, Raspberry Ripple, Patio Party DSP, Print Poetry DSP
Accessories:  Big Shot™, Fancy FanTextured Impressions™ Embossing Folder, Punches- 1” Punch (for banner points), Elegant Butterfly, 1 3/8” Circle, 1/16” HandHeld; 3/8” Raspberry Ripple Stitched Satin Ribbon, Pearls, Antique Brads 

After I finished creating this card and started to upload, I realized that I used Raspberry Ripple along with the Summer Starfruit and Primrose Petals (versus Pretty In Pink)- oh no!!  Hopefully this will not disqualify me from the challenge :-).

Thanks again for stopping by- I hope all of you have a fabulous Palm Sunday weekend!!

Wednesday, March 20, 2013

Another CAS Card with Two Challenges!!


Hi Stampers!!

I wanted to create a card using The Paper Players PP137 Sketch Challenge and, ever since I saw this challenge, I knew exactly what images that I wanted to use and that the DD44 colors at this week's Dynamic Duos Challenge would be perfect :-).  If you have not done so yet, check out both sites for wonderful inspiration from their Design Teams as well as the entries!

The Dynamic Duos colors remind me of a bumblebee and as I have mentioned before, my husband and I collect antique honey dishes and one of the criteria is that they must have a bee image of some sort.  We love the bee images but in reality, I am allergic to the real thing so when I see a real bee, I definitely freak out a bit! :-)   As long as they are on paper, I think they are so cool!

To create this CAS card:

Using the Embossing Buddy®, de-static a piece of Whisper White cardstock and stamp the images from Nature Walk using Versamark™ ink.  Apply Stampin’ Emboss® Black Embossing Powder and heat with the Heat Tool. 

Use the 1” Square Punch to punch out an opening in a scrap piece of Whisper White and position over the part of the embossed images that you want to use.  Apply So Saffron Classic Ink with a Sponge Dauber using the punched open area as a mask. 

Ink the background image from French Foliage with So Saffron Classic Ink and ink over the images.  Use the Color Spritzer Tool with the Basic Black Stampin’ Marker to apply a bit of spritzing.

Punch out the masked/sponged images using the 1” Square Punch and layer onto 1 ¼” Squares of Whisper White cardstock. 

Use the Big Shot™ and cut three rectangles from Basic Black cardstock using the Clearlits™ Scalloped Rectangle Die.  Cut the die cut pieces apart at the top of the 4th scallop from the bottom and overlap to create a square frame for the stamped images.

Emboss a piece of So Saffron cardstock using the Big Shot™ with the Honeycomb Textured Impressions™ Embossing Folder.  Add the punched layers at the top- the  Whisper White layer was punched with the Dotted Scallop Ribbon Border Punch and the Basic Black layer was created with the Scallop Trim Border Punch.  Add the 5/8” Basic Black Satin Ribbon bow.

Adhere the sentiment (I used a previously printed one from My Digital Studio cut with the Modern Label Punch and layered with another Modern Label piece from Basic Black)- love those pre-printed images from MDS :-)

Layer the Honeycomb background onto a Basic Black card front and again onto the Whisper White card base.

Mount the stamped images to the card front using Stampin’ Dimensionals® and add the Pearls to finish off the card.

Clean and Simple to me and I had a lot of fun creating it!!

Stamp Sets: Nature Walk, French Foliage, Thoughts & Prayers (MDS)

Ink: Versamark™,  Printer Ink- Black

Paper: Basic Black, Whisper White, So Saffron

Accessories:  Big Shot™,  Clearlits™ Scallop Rectangle,  Honeycomb Textured Impressions™ Embossing Folder, Sponge Dauber, Punches- 1” and 1 ¼” Square, Modern Label, Dotted Scallop Ribbon Border, Scallop Trim Border, Embossing Buddy®, Stampin’ Write® Black Embossing Powder, Heat Tool, Color Spritzer Tool, Pearls, 5/8” Basic Black Satin Ribbon (retired)

Thanks again for visiting- I hope all of you have a wonderful week!

CAS Quilt Card- Two Challenges in One!


Hi Stampers! 

I wanted to try another Clean and Simple (CAS) card and decided to use the CCMC243 Sketch atCreate with Connie and Mary along with the colors from the HSSCC155 HandStamped Sentiments Challenge.   If you have a chance, check them out!!

To create this card:

Using the 1 ¼” Square Punch, punch out squares from the Floral District and Sycamore Street Designer Series Paper (DSP).    Cut the squares on the diagonal to create triangles and adhere to a piece of thin paper (I love using the grid paper for this technique).  Use Two-Way Glue to adhere the triangles into the quilt pattern.

Use the Big Shot™ with the Square Lattice Textured Impressions™ Embossing Folder to emboss the quilt square and mount onto Whisper White cardstock.  

Cut a scalloped square From Rich Razzleberry cardstock with the Big Shot™ and the Scalloped Squares Duo Bigz™ Die.  Adhere the quilted square and mount the panel onto the embossed Whisper White background using Stampin’ Dimensionals.

Add the ½” Baja Breeze Seam Binding Ribbon bow along with the sentiment banner (create the banner points using the 1” Square Punch).

Stamp Sets:  Teeny Tiny Wishes

Ink: Rich Razzleberry

Cardstock: Whisper White, Rich Razzleberry, Floral District DSP, Sycamore Street DSP

Accessories:  Big Shot™, Square Lattice and Vintage Wallpaper Textured Impressions™ Embossing Folders, Scalloped Squares Duo Bigz™ Die,  Punches- 1 1/4” Square (for quilt squares) and 1” Punch (for banner points), ½” Baja Breeze Seam Binding Ribbon

Thanks again for stopping by- have a great week!

Sunday, March 17, 2013

What is Black, White and Red All Over :-) ?


Hi Stampers!!
 
I wanted to create a card for this week’s FM101 Challenge at The Friday Mashup! and decided to incorporate the colors from the CC302 Splitcoaststampers’ Color Challenge (Basic Black, Whisper White and Real Red) along with the TLC410 Chalkboard Technique.  

If you have a chance, check out the samples at all of these sites- such wonderful galleries!!

To create this card:

Using the Embossing Buddy®, de-static a piece of Basic Black cardstock and stamp the Ex Libris background stamp image using Versamark™ ink.   Apply Stampin’; Emboss® White Embossing Powder and heat with the Heat Tool. 

Trim the background layer to 4” x 5 ¼” and add the 5/8” Basic Black Satin Ribbon at the bottom of the panel.   Mount onto a piece of Basic Black cardstock (4 1/8” x 5 3/8”) and adhere to the Whisper White card base.

De-static, stamp with Versamark™ and heat emboss another piece of Basic Black cardstock with the sentiment from Trust God.  Once cooled, center and cut out with the Big Shot™ and the Adorning Apothecary Accents Framelit™.  Lightly sponge White Craft ink over the image to give the appearance of the chalkboard.

Create the rolled flowers using the 1 ¼” Circle punch to punch out six circles and the 1 3/8" Circle Punch to punch out one circle from Real Red cardstock.  Use the Crimper Tool to crimp all of the circles twice (run thru the Crimper once and then rotate and run thru the Crimper again).

Using scissors, start at the outside of the circle and cut a way spiral following the edge of the circle towards the center until you are in near the center (leave a flat bit of cardstock in the center to add glue and adhere the rolled flower). 

Add the Antique Brad to the sentiment layer and adhere the layer to the embossed background using Stampin' Dimensionals®.    Add the rolled flowers using Mini Glue Dots, add the 5/8" Basic Black Satin Ribbon bow and Pearls to finish off the card.

Stamp Sets: Ex Libris, Trust God

Ink: Versamark™, Craft White

Paper: Basic Black, Whisper White, Real Red

Accessories:  Big Shot™,  Adorning Apothecary Framelits™, Punches- 1 ¼”, 1 3/8” Circle and 1/16" Handheld, Sponge, Embossing Buddy®, Stampin’ Write® White Embossing Powder, Heat Tool, Crimper Tool, Antique Brad, Pearls, 5/8” Basic Black Satin Ribbon (retired)

Thanks again for visiting and I hope all of you have a blessed Sunday!

Friday, March 15, 2013

Get Well Wishes- a "Hybrid" Scrap Card :-)


Hi Again, Stampers!

Well, since I spent the entire evening crafting and while I still had out my previously digital images and other scraps from the previous project, I decided to utilize some of them to create a card using the colors in this week’sColourQ CQC180 Challenge.  Again, if you have the time, check them out- the variety of styles of their Design Team not to mention, all of the other entries offers so much inspiration!

I am thankful to say that this card is completely created from scraps from other projects or previously embossed/printed items- I have so many scraps that I am going to try to create a card from them at least once a week :-)  I love using My Digital Studio (MDS) to create cards (in fact, I have only created one scrapboook page in all the time that I have had the program!!).

To create this card:

Layer the embossed background onto Basic Black card friont (I had previously inked the interior of the Lacy Brocade Textured Impressions™ Embossing Folder with Basic Gray Classic Ink and embossed it with the Big Shot™).

Layer a piece of Lucky Limeade Designer Series Paper (DSP) onto Basic Black cardstock and trim to size. 

Using My Digital Studio, print out the pump image from Countryside(I had re-sized this one to be larger than the stamp image) onto Whisper White cardstock and color using Stampin’ Write Markers in Basic Gray, Lucky Limeade and Glorious Green.  

I know, Glorious Green is a retired color but it is amazing our long the Stampin' Write  markers last if they are stored in a horizontal fashion ( I believe this one is at least ten years old but I rarely use this color :-)).     

I also created a few shadows with the Sahara Sand marker as well (this is considered a neutral so I did not violate the color challenge- lol!! )

Cut the image out using the Big Shot™ with the Ovals Framelits™ and lightly sponge Basic Gray Classic Ink around the edges (be careful with this step- I had to sponge off a bit so it would not be too dark). 

Use the Color Spritzer Tool with the Basic Gray Stampin’ Write marker to lightly spritz the image and layer Basic Black frame (cut with the Big Shot™ and the Apothecary Accents Framelits™) behind the image. 

Use either another oval cut with the same size Oval Framelit™ as the image (cut the oval in half to allow it to show behind the focal image) or use a 2 ½” Circle cut in half from Basic Black cardstock (this is what I used since it was in my scraps:- love those scraps!).

Add the Antique Brads in the corners of the frame and mount onto the Lucky Limeade panel using Stampin’ Dimensionals®. 

Stamp the sentiment from Teeny Tiny Wishes using Basic Gray Classic Ink and punch out with the Word Window punch.  Layer behind another layer from the Word Window Punch (in Basic Black) and add the 1” Circle of Basic Gray (previous embossed with the Woodgrain  Textured Impressions™ Embossing Folder) layered onto the 1 ¼” Circle of Basic Black. 

Add the sentiment layer (again with Stampin’ Dimensionals®) and the Pearls to finish off the card.

Stamp Sets: Countryside (MDS Stamp Brush Set), Teeny Tiny Wishes

Ink: Printer Ink- Black, Stampin’ Write Markers- Basic Gray, Lucky Limeade, Sahara Sand, Glorious Green (retired)

Paper: Whisper White, Basic Gray, Basic Black, Lucky Limeade DSP

Accessories:  Big Shot™, Lacy Brocade and Woodgrain Textured Impressions™ Embossing Folders, Oval and Apothecary Accents Framelits™,  Color Spritzer Tool, Punches- Word Window, 1” and 1 1/4” Circle, Antique Brads, Pearls

Thanks again for your visit – I hope you like this card!!    I think I may have to take a nap now…have a great Friday!
Related Posts Plugin for WordPress, Blogger...