Sunday, October 29, 2017

Philippians 1:6- He Who Has Begun A Good Work In You


Hi Friends!

I 
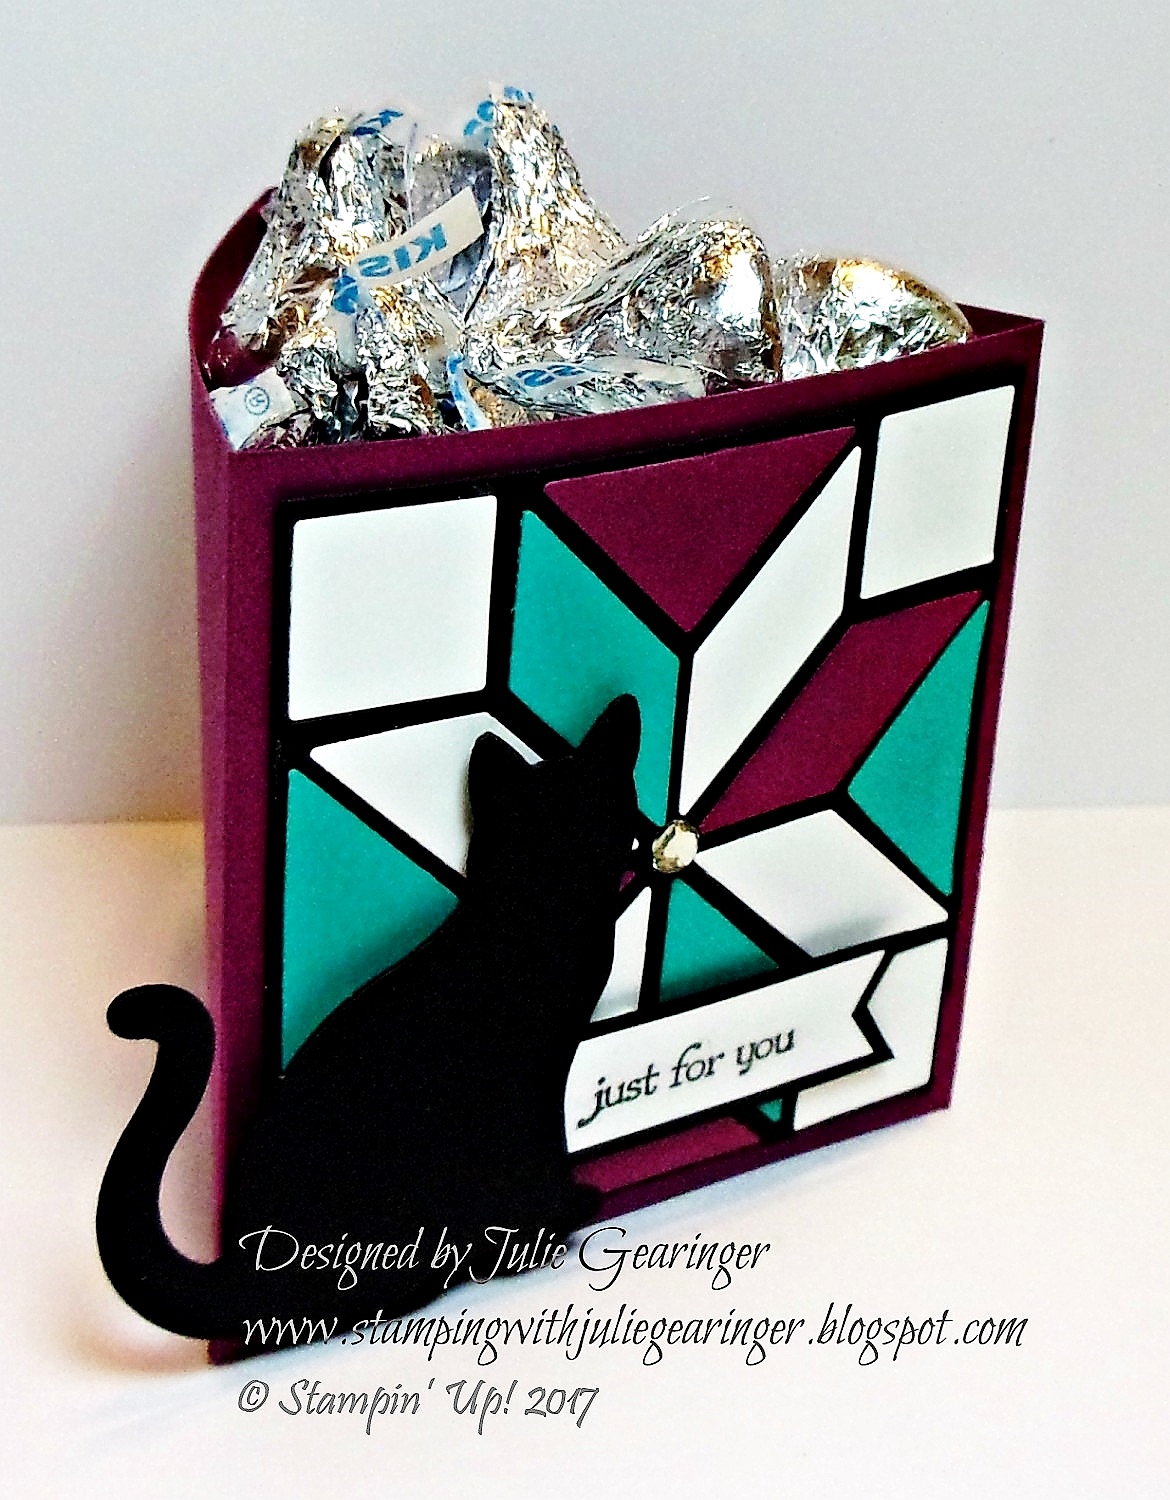
hope all of you had a fabulous weekend! I had a chance to finish a card this evening using Verve Stamps, Scripture Medley 3 for the Viva La Verve October 2017 Sketch Challenge.  

I also incorporated some Stampin' Up! retired paper, ribbon from my stash, sequins and a few 
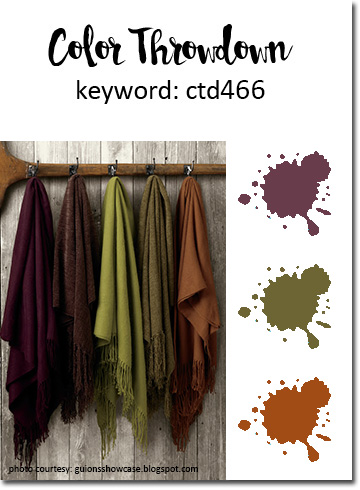
die cuts along with the Color Throwdown #466 Challenge for the color palette and the Tic-Tac-Toe #021 Challenge (middle row across- Purple – Free- Sequins) for additional inspiration.

If you have not had a chance to check out the challenge sites yet, I encourage you to do so- gorgeous galleries and ideas from all!

To create this card:

1). Ink the Scripture Medley 3 verse sentiment with Versafine® Onyx Black ink, stamp onto white cardstock, apply clear embossing powder and heat set with a heat tool.  Once the powder has cooled, die cut the image with a stitched square die, mount onto espresso cardstock (trimming close to the edge) and use a stencil brush with a flourish stencil to apply antique linen distress ink.

2). Layer the rust gingham designer paper onto espresso cardstock, trim and mount onto olive cardstock.  Add the plum ribbon layer (per the vertical strip in the sketch) and mount the entire panel onto the espresso card front.  Adhere the card front onto the white card base.

3). Cut a piece of olive patterned paper to fit the stitched espresso rectangle die cut, mount the layered sentiment onto the panel and adhere to the card front with dimensional foam.

4). Die cut the leaf image from plum and rust cardstock, layer together and add to the card front with dimensional foam.

5). Finish off the card with a few purple sequins and the purple bow.

Stamp Sets: Scripture Medley 3 (Verve Stamps)

Ink/Mediums: Versafine® Onyx Black, Tim Holtz® Antique Linen Distress Ink

Paper: Whisper White, Cajun Craze, Early Espresso, Old Olive, Perfect Plum; retired Orchard Harvest and Merry Moments Designer Series Paper (all Stampin’ Up!)

Accessories/Tools: Big Shot™, My Favorite Things™ Square and Rectangle Stitched STAX Dies, SU! Seasonal Layers Thinlits™, Embossing Buddy®, Stampin’ Emboss® Clear Embossing Powder, Heat Tool, ½” Wired Purple Ribbon (from my stash), Purple Sequins (Crafters Medley),  Clarity™ Stencil Brush, Memory Box™ Heartland Stencil


Thanks again for taking the time to stop by- hugs and I hope you have a blessed week!

Wednesday, October 25, 2017

Painted Harvest- Gather Together and Give Thanks


Hi Friends!

Today I am sharing a card that I created using the Painted Harvest stamp set (Stampin’ Up! Holiday Mini Catalog) along with Timeless Textures.   I also pulled out a few retired tools (Distressing Tool and Crimper Tool) along with some retired lace , hemp twine and button to  complete the card :-)

I wanted to play along with the Fab Friday #123 Sketch Challenge and also incorporated the Hand Stamped Sentiments #275 Photo Inspiration Challenge (I was inspired by the sunflowers and Autumn colors)  along with the Simon Says Wednesday “Anything Goes” Challenge.

If you have not had a chance to check out the challenge sites yet, I encourage you to do so- tremendous inspiration from all!

To create this card:

1). Ink the Sunflower petal #1 image from Painted Harvest with Pumpkin Pie Classic Ink, stamp off onto a piece of scrap paper and stamp onto a 4” x 5 ¼” panel of Very Vanilla cardstock.  Rotate the petal and repeat the steps three times for each flower and stamp three flowers onto the panel.

2). Ink the Sunflower petal #2 image from Painted Harvest with Cajun Craze ink and stamp onto the petals created in step #1.  Rotate the image and repeatedly stamp several times for each flower.

3). Ink the center of the flower image from Painted Harvest with Soft Suede Classic Ink and stamp several times in the center of the petals.  Stamp the final time with Early Espresso Classic Ink.

4). Create a mask from sticky note paper for the flower petals, mask the flowers and stamp the solid leaf and fern images from Painted Harvest with Wild Wasabi Classic Ink.  Stamp the detailed leaf image with Always Artichoke Classic Ink.

5). Distress the panel with a distressing tool and use a sponge dauber to apply Early Espresso Classic Ink over the edges and onto the background to “age” the paper.  Add additional distressing with the small splatter stamp from Timeless Textures using Early Espresso Classic Ink.

6). Mount the distressed/stamped panel onto a piece of Early Espresso cardstock, distress the edges and mount onto the Always Artichoke card front.  Adhere the entire card front onto the white card base.

7). Use a crimper tool to crimp scrap pieces of Pumpkin Pie and Cajun Craze cardstock, cut into a banner, distress the edges and sponge with Early Espresso cardstock.  Mount the banners at the top right hand corner (per the sketch) and add the twine bow with the Pumpkin Pie button detail.

8). De-static a scrap piece of Early Espresso cardstock with an Embossing Buddy®, stamp the sentiment from Painted Harvest using Versamark™ ink, apply Stampin’ Emboss® White Embossing Powder and heat set with the Heat Tool.  Trim the panel, add a piece of retired Venetian Crochet Lace and mount onto the card front with dimensional foam.

Stamp Sets: Painted Harvest, Timeless Textures (both Stampin’ Up!)

Ink/Mediums: Always Artichoke, Cajun Craze, Early Espresso, Pumpkin Pie, Soft Suede, Wild Wasabi; Versamark™

Paper: Very Vanilla, Always Artichoke, Early Espresso

Accessories/Tools: Embossing Buddy®, Stampin’ Emboss® White Embossing Powder, Heat Tool, Distressing Tool, Crimper Tool, Hemp Twine, Venetian Crochet Lace, Pumpkin Pie Button


Thanks again for taking the time to stop by- hugs and I hope you have a great week!

SC668 Peace Joy Love


Hi Friends!

Woohoo! It’s time for the SC668 Sketch Challenge at Splitcoaststampers! Allison is our sketch artist this week and since I need a few more Christmas cards for my "stash", I decided to pull out some of the new Stampin’ Up! Holiday Mini Catalog items to create my card.


If you have not had a chance to visit the Splitcoaststampers’ Sketch gallery or the other challenge sites yet, I hope you will do so- such wonderful inspiration from all!

To create this card:

1). Trim pieces of the Merry Music Specialty Designer Series Paper to fit the 5 ¼” x 5 ½” Basic Black card front, adhere leaving a gap for the ribbon layer. 

 2). Ink the berry branch image from Musical Season with Stampin’ Archival™ Black Ink, stamp onto a piece of Whisper White cardstock, apply clear embossing powder, heat set with the heat tool and once the embossing has cooled, stamp the scroll image from Musical Season repeatedly with Smoky Slate Classic Ink (stamping off before stamping onto the panel).  Trim the panel and use a Circle Layering Framelit™ to create the rounded edge of the tag element in the sketch, also cutting a piece of Basic Black cardstock for the layer behind the stamped panel.

3). Mount the stamped tag element created in Step #2 onto the card front, add the 1” Black Satin Ribbon along with the 3/8” White Taffeta Ribbon to cover the cut edges, wrap the ends of the ribbon behind the card front and mount the entire card front onto a 5 ¼” x 5 ½” white card base.

4). Die cut the French Horn from Silver Foil and Basic Black cardstock using the Musical Instruments Framelits™ Dies.  Ink the scroll image from Musical Season with Stampin’ Archival™ Black Ink, stamp over the foil die cut, apply Silver Embossing Powder and heat set with the Heat Tool.  Once the embossing has cooled, layer the silver French Horn over the black French Horn Die cut and mount onto the card front with dimensional foam.

5). Ink the sentiment from Musical Season with Stampin’ Archival™ Black Ink, apply clear embossing powder and heat set with the heat tool.  Once the embossing has cooled, trim the sentiment, create the flag banner with by hand or with a punch (I used the retired Hexagon Punch), mount onto Basic Black cardstock (also trimming and creating the flag banner). 

6). Add a loop of Silver Metallic Thread to the card front and mount the layered sentiment over the metallic thread with dimensional foam.

7). Add a few Rhinestones to finish off the card.

Stamp Sets: Musical Season (Stampin’ Up!)

Ink/Mediums: Stampin’ Archival™ Black, Smoky Slate

Paper: Whisper White, Basic Black, Silver Foil; Merry Music Specialty Designer Series Paper

Accessories/Tools: Big Shot™, Musical Instruments Framelits™ , Layering Circles Framelits™,  Embossing Buddy®, Clear and Silver EP, Heat Tool, Rhinestones, retired 3/8” White Taffeta Ribbon, 1” Black Satin Ribbon (from my stash)


Thanks again for taking the time to visit- we hope you can join us at Splitcoaststampers for this week’ssketch challenge!  Hugs and I hope all of you have a wonderful week, sweet friends!

Tuesday, October 24, 2017

Sending Peace and Strength

Hi Friends!

Today I am sharing a card that I designed using Power Poppy’s Easy Breezy Coneflowers along with a sentiment from Olive ‘n Oak. 

In honor of their birthday, I wanted to play along with The Flower Challenge #13 “Your Favourite Flower”Challenge but had a hard time choosing my favorite flower stamp.  I have so many floral stamps and images, how can you choose just one?  In the end, I decided to use Power Poppy Stamps since I absolutely love all of the flowers and foliage in the Power Poppy line!  The Flower Challenge has many sponsors for this birthday challenge and if I were lucky enough to win, I would love to win Prize #5 from  Power Poppy :-)

I decided to use this coneflower image and enter my second entry into the Just Us Girls #416 Color Week Challenge.  I am also linking this card to the Happy Little Stampers October 2017 Watercolor “AnythingGoes” Challenge into the design as well.

If you have not had a chance to check out the challenge sites yet, I encourage you to do so- gorgeous inspiration from all!

To create this card:

1). Print out the Power Poppy Easy Breezy Coneflower image along with the sentiment from Olive ‘n Oak onto white cardstock (I use an inkjet printer along with the retired My Digital Studio™ software from Stampin’ Up! to re-size the images, etc.).

2). Color the image with watercolor pencils using an AquaPainter™ to blend.  Once you are satisfied with the coloring, create a mask, mask the flowers and use a stencil brush with hickory smoke distress ink to stencil the background.

3). Using the Big Shot™ with a stitched rectangle die to die cut the panel.  Mount the panel onto black cardstock, trim close to the edge. 

4). Trim a piece of gray cardstock to approx.. 4” x 5 ¼”, mount onto a piece of black cardstock and adhere to the white card base. 

5). Add the 3/8” black and white check triple ribbon bow to the bottom of the coneflower layered panel and mount onto the card front. 

6). Die cut the sentiment with a stitched banner die, mount onto black cardstock and trim close to the edge. Add the sentiment to the card front with dimensional foam.

7). Use a clear glitter pen to add shimmer to the petals and an extra fine white paint pen to add highlights to the flower centers to finish off the card.

Stamp Sets: Easy Breezy Coneflowers, Olive ‘n Oak (both digital from Power Poppy)

Ink/Mediums: Printer Ink- Black; Derwent® and Stampin' Up! Watercolor Pencils, Spectrum Noir™ Clear Glitter Pen, Holtz® Hickory Smoke Distress Ink, Sharpie® Extra Fine White Paint Pen

Paper: Whisper White, Basic Black, Basic Gray

Accessories/Tools: Big Shot™, MFT Stitched Rectangle and Jumbo Stitched Fishtail Banner STAX Dies; Clarity™ Stencil Brush, MB Stencil, 3/8” Black and White Check Ribbon

Thanks again for taking the time to stop by- hugs and I hope you have a blessed week!

SUO186 Triangular Treat Box- Just for You


Hi Friends!   


Since I do not own any current Stampin’ Up! sets that feature coffee, cupcakes, candy, tea or other "sweet treats" , I decided to create a Triangular Treat Box using this tutorial from Splitcoaststampers (see written tutorial here and tutorial video here). 

I wanted to incorporate two of my favorite items from the Holiday Mini Catalog- the Cat Punch and the Quilt Builder Framelits™ Dies.  I had die-cut the "quilts" from pieces of background paper that I used in other cards (fyi- I tend to die cut shapes from cardstock layers that are “hidden” by other layers to reduce the postage costs as well as re-purposing cardstock that would otherwise be wasted:-)).

I am also linking to the Just Us Girls #416 Color Week Challenge (Bermuda Bay is a shade of green, right?) and the International Art & Soul #19 “Not Square or Rectangles” Challenge. 

If you have not had a chance to stop by the SU-Only Challenge site to check out the rest of the Design Team’s samples or the other challenge sites yet, I encourage you to do so- fabulous wonderful inspiration from all!

To create this project:

1). Using the Big Shot™ with the Quilt Builder Framelits™ and die cut four separate  quilt images – one each from Whisper White, Basic Black, Rich  Razzleberry and Bermuda Bay cardstock (I use a piece of Glad®  Press ‘n Seal® (PNS) to hold all of the quilt die pieces together).  Arrange the pieces onto the Basic Black backing square, just peel off each piece of the PNS and adhere to the quilt (I used the Two Way Glue Pen).

2). Using the tutorial linked above for the Triangular Treat Box, score a piece of 3” x 11” Rich Razzleberry cardstock at the 3”, 6” and 9” mark.  Continue with the tutorial to create the bottom from a scrap piece of Rich Razzleberry cardstock and assemble the box.

3). Use the Cat Punch to punch out three cats from Basic Black cardstock, layer the three together to create the cat embellishment.

4). Trim the quilt (my frame around the quilt was a bit “off” so I trimmed it to even up the sides- if you are able to die-cut it perfect, then you may not need to trim- lol!).  Add the assembled quilt to the front of the box.


5). Stamp the sentiment from Teeny Tiny Wishes using Stampin’ Archival™ Basic Black Ink onto a scrap piece of Whisper White cardstock, trim and create the banner by hand (I used the retired Hexagon Punch).  Mount onto a piece of Basic Black cardstock and trim around the edges.  Add to the back of the Cat Punch image and mount onto the front of the box with Stampin’ Dimensionals®.

6). Add a Rhinestone to the center of the quilt to finish off the box.  Fill with “Sweet Treats” and enjoy!  A quick and easy treat box for any occasion!

Stamp Sets: Teeny Tiny Wishes

Ink/Mediums: Stampin’ Archival™ Basic Black
Paper: Whisper White, Basic Black, Bermuda Bay, Rich Razzleberry
Accessories/Tools: Big Shot™, Quilt Builder Thinlits™ Dies, Rhinestones, retired Hexagon Punch, Glad®  Press ‘n Seal®

Thanks again for taking the time to stop by and I hope that you will create your own Stampin’ Up! Only project and join us for our “Treats of All Kinds”  challenge!

Friday, October 20, 2017

F4A400 Blessed Beyond Measure

Hi Friends!

I hope all of you are having a great week so far!  This card was designed for the Splitcoaststampers F4A40 “Bon Appetit!” Challenge in honor of October 20- International Chefs Day (challenge details and gallery).

I tend to bake more than cook (at least during the holidays) and wanted to ink up the retired Stampin’ Up! Perfect Mix stamp set.  I am determined to use my retired stamps more often, so I thought that the "Bon Appetit!" Challenge would be the perfect one to give the Perfect Mix stamp set some "love" :-)

I paired it with the "brand new to me" So Blessed Stamp Set from Technique Tuesday and incorporated the Atlantic Hearts #234 Sketch Challenge into the design.


If you have not had a chance to check out the above challenge sites, I hope you will find time to do so- great inspiration from all!

To create this card:

1). Arrange the Perfect Mix baking utensil images onto a clear acrylic block and stamp repeatedly onto a piece of retired Poppy Parade cardstock using Versafine™ Onyx Black Ink.  Trim the panel, mount onto a piece of Basic Black cardstock, trim and mount onto a piece of Very Vanilla cardstock.

2). Ink the images from the Perfect Mix stamp set with Versafine™ Onyx Black Ink, apply Clear Embossing Powder and heat set with the Heat Tool. Color the images with Stampin’ Write Markers- Dapper Denim and Poppy Parade.  Use an AquaPainter™ to dilute some of the marker ink to give more dimension (I scribble the ink onto a silicone craft mat and dilute with the water brush).  Use a Spectrum Noir Clear Glitter Pen to add shimmer to the batter and some of the handles.  Once you are satisfied with the coloring, fussy-cut each image.

3). Using Very Vanilla along with the MFT Stitched Rectangle STAX Die, die cut one panels for the sketch and die cut another panel a bit smaller size from a piece of Graphic45 Home Sweet Home 6x6 paper.  Mount both onto Basic Black cardstock and trim close to the edges.

4). Cut another of the smaller stitched rectangles from Very Vanilla cardstock, de-static with an Embossing Buddy® stamp the sentiment “Blessed” from the So Blessed stamp set (Technique Tuesday®) with Versafine™ Black Onyx Ink, apply Clear Embossing Powder and heat set with the Heat Tool.  Mount onto Basic Black cardstock and trim close to the edge.  Add a strip of 3/8” Red and Black Gingham Ribbon, wrapping the edges behind the panel.  Adhere the triple bow of 3/8” Red and Black Gingham (FYI- I used Hot Glue to adhere the bow).

5). Layer the panels per the sketch onto the card front.  Add ½ of the Paper Doily to the back of the sentiment panel and mount the panel onto the card front with dimensional foam .  Add the baking utensil items (using dimensional foam, when needed). 

6). Ink the sentiment from So Blessed with Versafine™ Black Onyx Ink, stamp onto a scrap piece of Basic Black cardstock, apply Winter White embossing powder and heat set with the Heat Tool.  Trim the sentiment and create the fish tail banner ends (I used the retired Hexagon Punch but they can be created by hand or with a square punch).  Finish off the card by mounting the fussy-cut baking utensil items onto the card (using dimensional foam as needed).

Stamp Sets: Perfect Mix (retired Stampin’ Up!), So Blessed (current set from Technique Tuesday®)

Ink/Mediums: Versafine™ Black Onyx; Stampin’ Write Markers- Poppy Parade, Dapper Denim; Spectrum Noir™ Clear Glitter Pen

Paper: Very Vanilla, Basic Black, Dapper Denim, retired Poppy Parade; Graphic 45 Home Sweet Home 6x6 Paper
Accessories: Big Shot™, My Favorite Things™ Stitched Rectangle STAX Dies, Embossing Buddy®, Stampin’ Emboss® Clear Embossing Powder, Heat Tool, 3/8” Red and Black Gingham Ribbon


Thanks again for taking the time to stop by- if you have the time, come play along with us at the Free For All Challenges   Hugs and have a great week!

Wednesday, October 18, 2017

TCC80 His Love Endures Forever


Hi Friends!!

It’s time for the new #80 {Autumn Love} Challenge at The Card Concept! Look at all of the fun elements in this inspiration photo- the owls, the cake with the texture and neutral tones, the leaves and so much more!

I was inspired by the texture of the tone on tone of the cake as well as the colorful leaves and theme of love for my Classy and Elegant card.  The verse says it all- “Give Thanks to the Lord for He is Good, His Love Endures Forever”  1 Chron 16:34.  I am so thankful that God’s Love for us endures forever, aren’t you?

So what will inspire you from our photo?  We would love for you to join us, create a card using our photo for inspiration and add your artwork to our Challenge #80 gallery.


 If you have not had a chance to do so, I hope you will find the time to check out the rest of the wonderful Design Team cards at The Card Concept as well as the entries at the other challenge sites- fabulous inspiration from all!

To create this card:
1). Using the leaf image from Botanicals (retired Stampin’ Up!), stamp three of the same image with Versafine™ Onyx Black ink onto Very Vanilla cardstock, apply Clear Embossing Powder and heat set with the Heat Tool.  Once the embossing has cooled, watercolor the images using an AquaPainter™ and ink from Classic Ink Pads (SU!)- Crushed Curry, Pumpkin Pie and Cajun Craze.  Fussy-cut each of the leaves and set aside.

2). Ink the sentiment from Scripture Medley 3 (Verve Stamps) with Versafine™ Onyx Black ink onto Very Vanilla cardstock, apply Clear Embossing Powder and heat set with the Heat Tool.  Once cooled, die cut with the MFT Pierced Traditional Tag STAX Die.

3). Using the Big Shot™ with the Crafters Companion™ Ornate Lace Embossing Folder, emboss a piece of Very Vanilla cardstock.  Trim the panel to 4” x 5 ¼”, mount onto a piece of Very Vanilla cardstock and adhere to the white card base.

4). Mount the sentiment tag and leaves to the card front with dimensional foam.

5). Apply shimmer to the leaves with the Spectrum Noir™ Clear Glitter Pen and add a few pearls to the corner of the sentiment tag to finish off the card.

Stamp Sets:  Scripture Medley 3 (Verve Stamps), retired Botanicals (Stampin’ Up!)

Ink/Mediums: Versafine™ Onyx Black Ink, Classic Ink (SU!)- Cajun Craze Crushed Curry, Pumpkin Pie; Spectrum Noir™ Clear Glitter Pen

Cardstock/Paper: Very Vanilla, Extra Thick Whisper White

Accessories: Big Shot™, Ornate Lace (Crafters Companion™) Embossing Folder, MFT Pierced Traditional Tag STAX Dies, Embossing Buddy®, Heat Tool, Clear Embossing Powder,  Pearls

Thanks again for taking the time to stop by!  I hope I have inspired you today and that you will be able to join us for the #80“Autumn Love” Challenge at The Card Concept!
Related Posts Plugin for WordPress, Blogger...